Hi there! In this tutorial, I’ll be guiding you through the use of Git version control step by step. You’ll see examples with screenshots showing the information that Git displays every time you execute a command. Plus, I’ll write out each command so that you can easily copy and paste it to apply it to your own project.
To get started with Git, you’ll need a terminal from which to execute the command line instructions, as well as the installed application. You can download the latter from the official website.
Índice de contenidos del artículo

If we work locally (we start in the image on the left), we initialize the working directory (working directory). We can work (edit files) in the working directory.
With the Git add command we send the changes to staging , which is an intermediate state in which the files to be sent in the commit are stored. Finally with commit we send it to the local repository.
If we want to collaborate with others, with push we upload the files to a remote repo and with pull we could bring the changes made by others remotely to our working directory.
If we start working remotely, the first thing we do is clone the information in the local directory.
With git help in the terminal we get help.
Let’s look at the configuration help with
#git help config
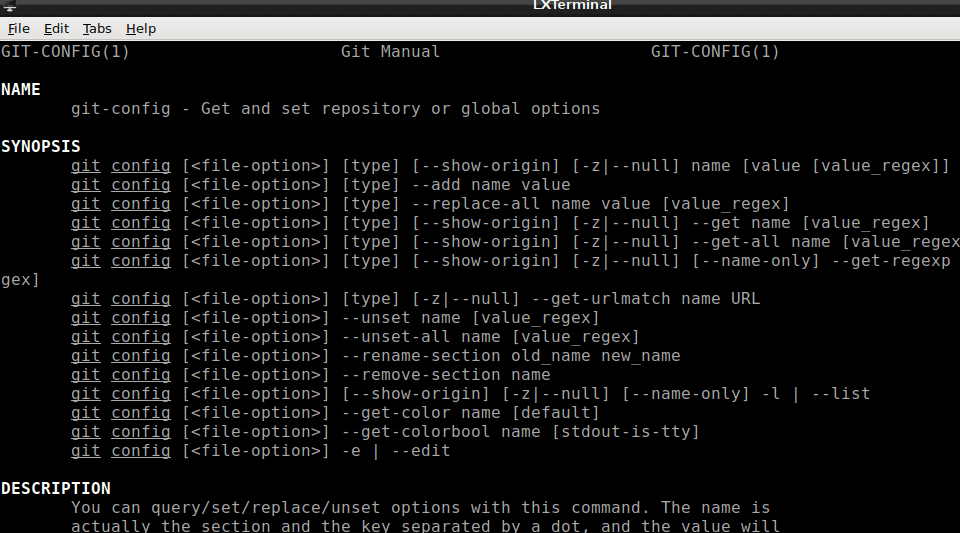
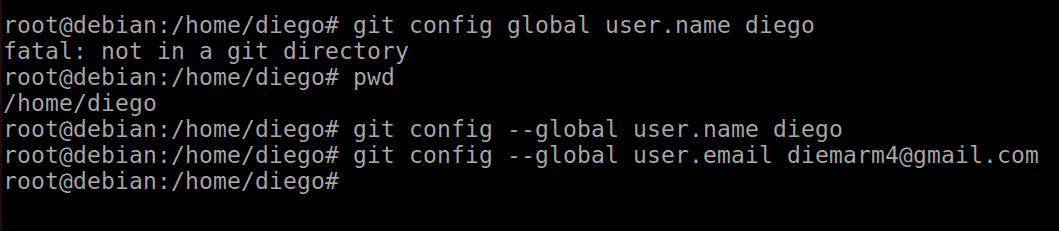
At a minimum we must configure the name and email in the application with the following commands:
git config --global user.name "Tu nombre aquí"
git config --global user.email "tu_email_aquí@example.com"
To check we can use:
git config -–global –list
What the system does is create a text file called .gitconfig, so we can display it with cat as well if we’re using a Linux system:
cat ~/.gitconfig
We place ourselves in the folder in which we want to work. We make sure with pwd, to know where we are.
Now with git init and the project name, we create a new project:
git init prueba01
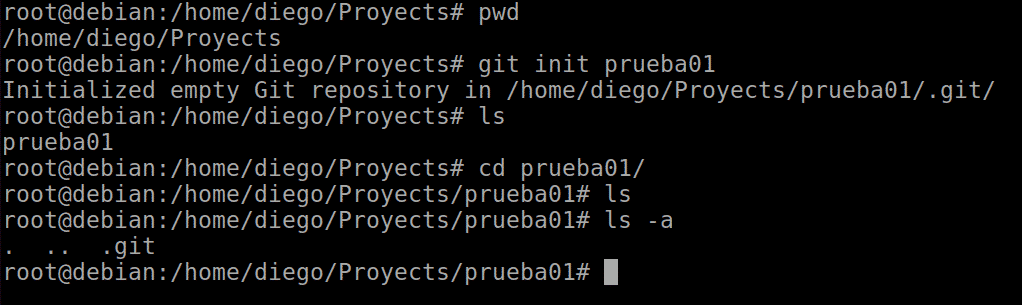
This creates a folder with the same name and inside it, we can see with ls -a that a hidden .git subfolder is created for the control and management of the tool.
We use Initializr to download a demo project, put it in a folder, go into it and just run git init.

Now we are going to create some file in the first of the projects. I have created a README.md file with the content: #Git Demo.
Now, in the project folder we execute
git status
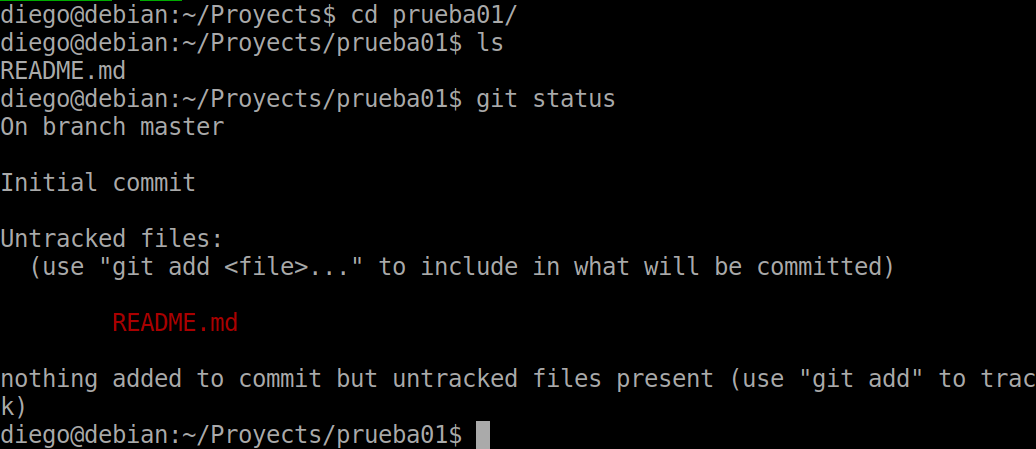
We can see the details. We are located in the master branch and we have a file that has not been added yet.
The first thing we are going to do is add it to the staging, also called the Git Index, using the git add command:
git add README.md
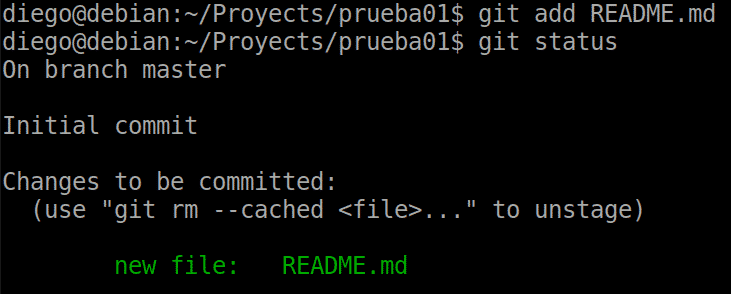
Now we see that the file is already waiting to be committed to the repo.
When executing commit we do not specify which files will be committed. All those in staging are sent. Let’s add the -m option to add a message to the commit, for example “initial commit”:
git commit -m “commit inicial”

We will see a message similar to this:
If we do a status now we will see that the staging area is empty and there is no pending commit.
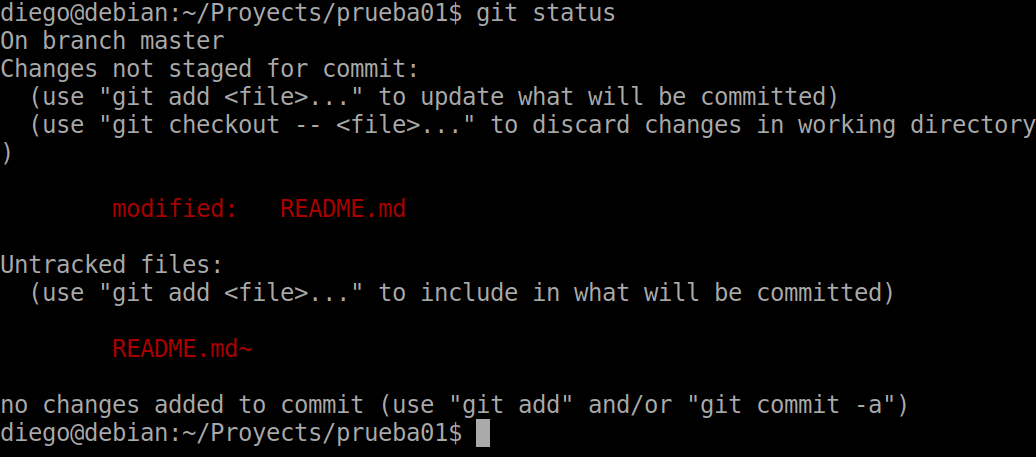
Now we are going to add more content to the README file and do a status.
We will see that now the system tells us that there are changes not sent to staging:
With the same procedure as before, we add (add) and make a new commit:

We can also do the add and commit in one step with:
git commit -a
As recommended by Git itself in the screenshot above. If we also want to add the message, it would be
git commit -am “msj”
We can make some more changes and add another file, for example an index.html to the project.
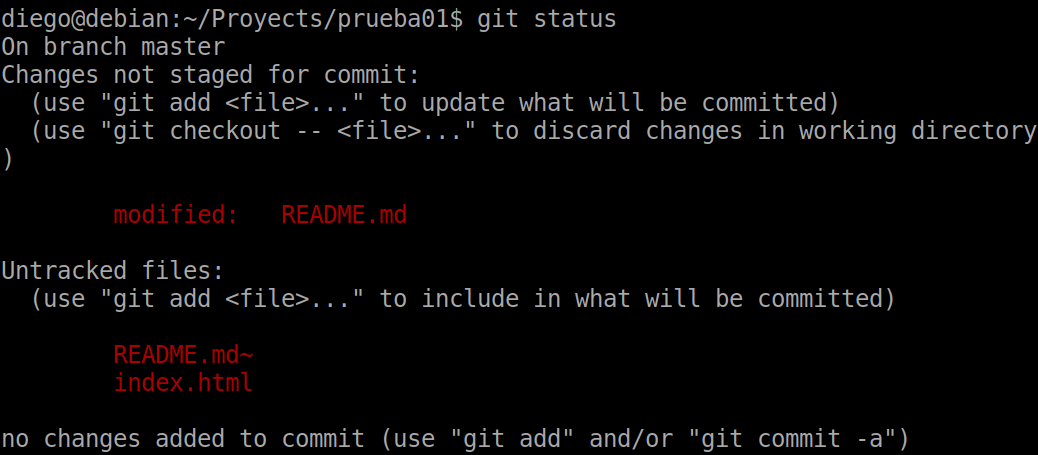
In this case we are going to add the modified or new files to the staging recursively with
git add .
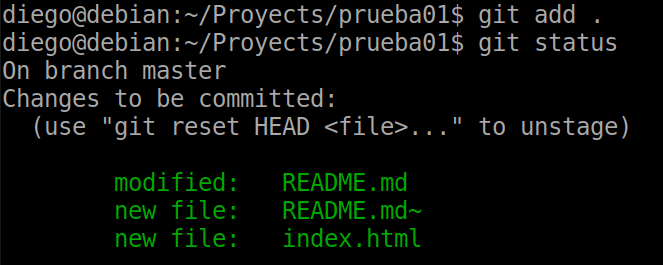
A new commit:

We’re going to make some change again and add it to the staging. If we look at the capture of the previous add operation, the system tells us that we can take a file out of the stage with git reset HEAD and the name of the file. We tried it with README:
git reset HEAD README.md
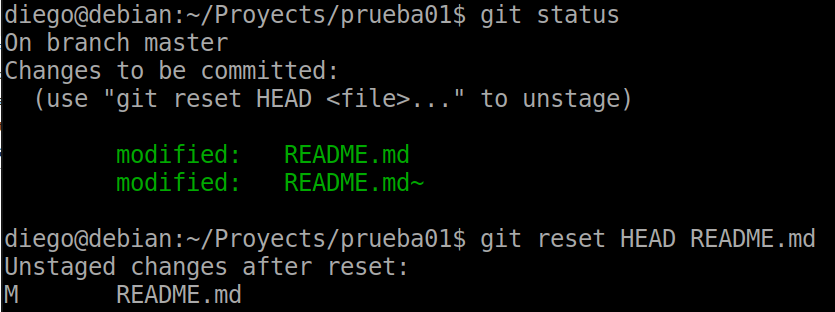
A new status will indicate that there is one staging and another to be added:
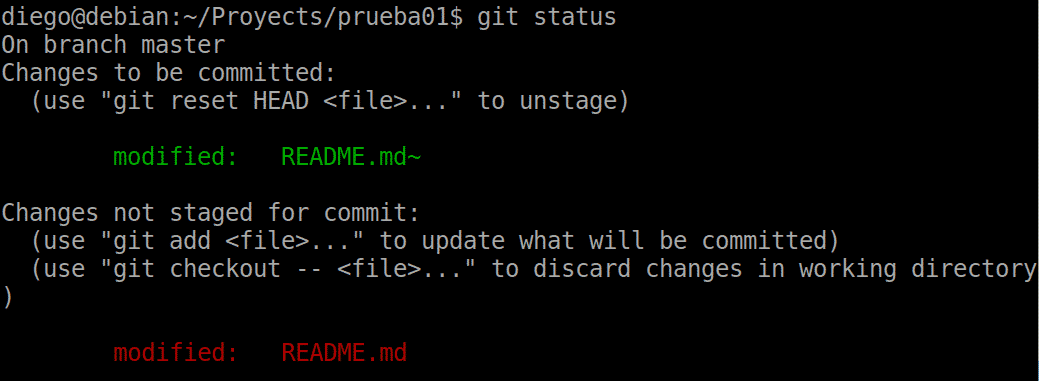
As we can see, we can also discard the changes in the working directory with checkout:
git checkout -- README.md
This returns our readme file to the previous state.
Remember that you can consult the help to see more options and commands. Here you can some additional examples .
With git log we can see the history of operations that we have done:
git log

We can see that the commits have been made in reverse chronological order with the different users and that each one has its associated key and date.
With git help log we can see the options that exist. An example of a compact and colorful view would be:
git log --oneline --graph --decorate --color

Let’s imagine that one of the files that is already in the git repository after a commit we don’t want there. We can use the remove rm command and the file name:
git rm index.html
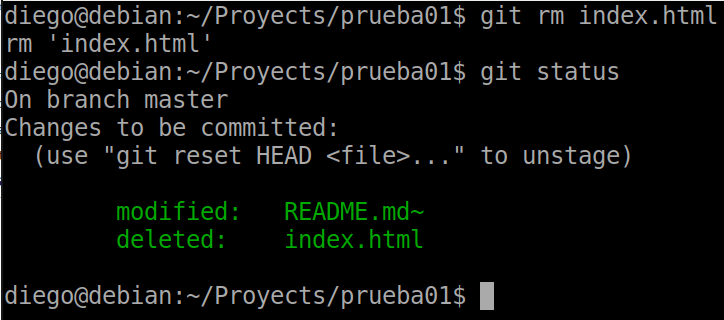
We can see that the status indicates that the change executed for the file to be deleted is in staging. To remove it we must make a new commit:
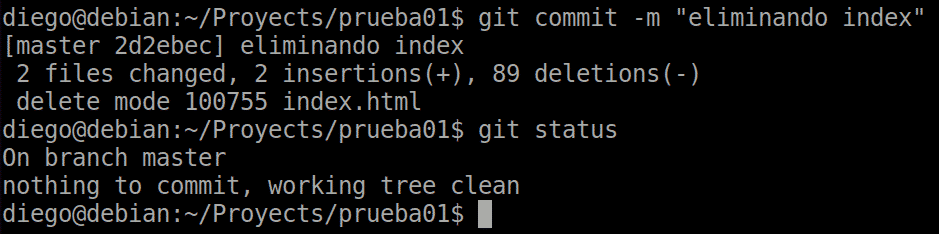
We will now see that the index file is no longer in the working directory.
Now we are going to add a new file, add it to staging and commit. We are going to remove it manually from the OS file system, not from Git.

Now I delete the file humans.txt and we do a status:
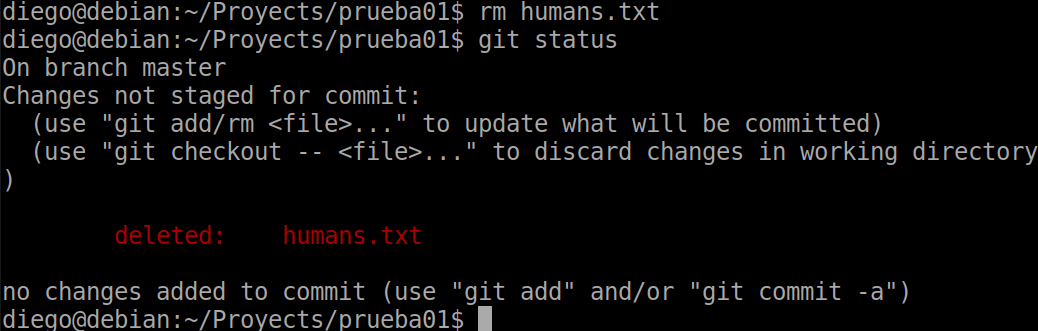
As the same screen indicates, we can use add or rm so that the changes are definitely added to the staging.
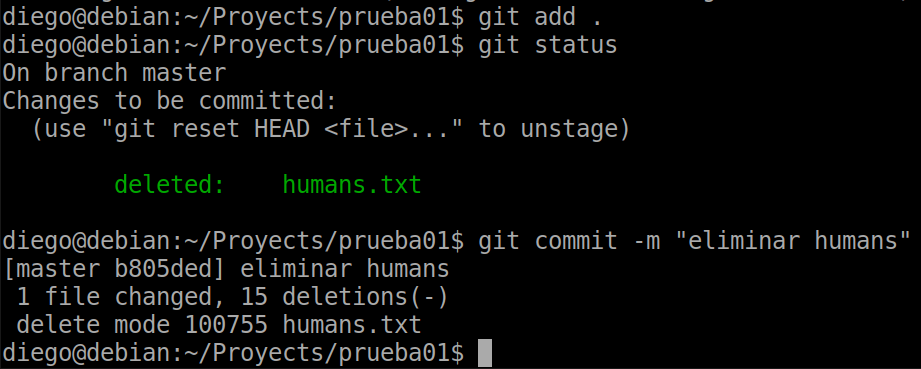
In this case an add has been used and after a commit the deletion has been executed in the repo.
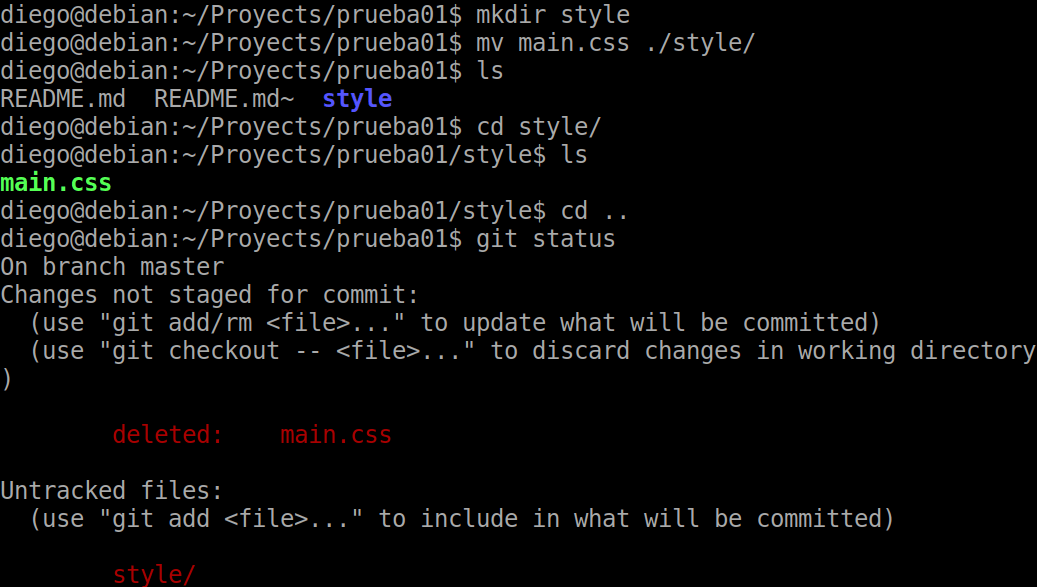
We are going to create a new “ style ” folder to host a new css style file which is now in the root folder of the project and already in the repository.
Let’s first try to manually move the file:
In this case we are going to run git commit -a to add to the staging and commit with a single operation:
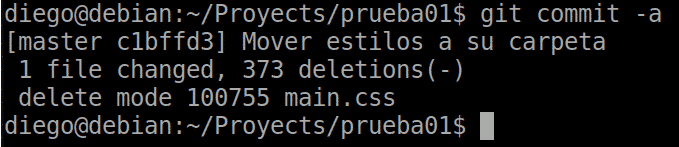
Eye! If we do a status again we will see that the styles folder has not been updated correctly. We’ll have to make it recursive with git add . and then the commit .
Now we have a file that we never want to be added to the repo, for example a log file.
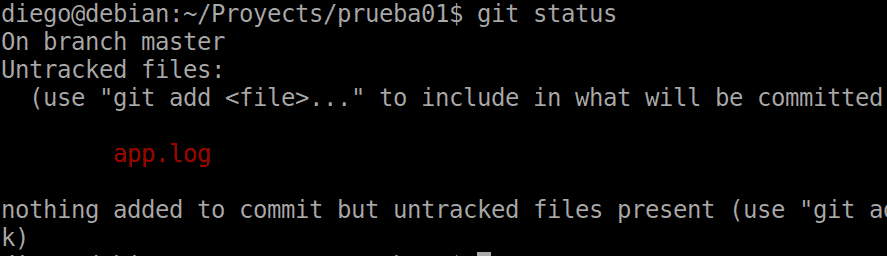
In Debian Linux, with the nano command we can edit a file in a text editor in the terminal.
Let’s edit the .gitignore file, in which we specify the files to ignore on separate lines.
nano .gitignore
And in the file, which will appear empty, we add in the first line *.log. We save and exit.

Now we do a status and we will see the .gitignore file to add to staging :
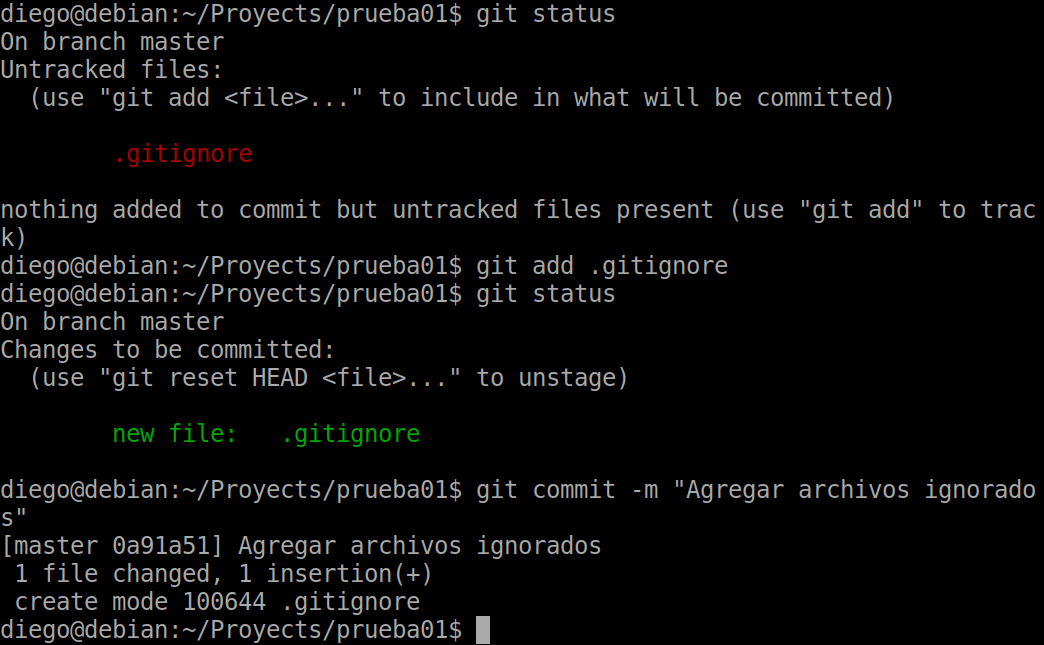
We have also made a new commit .
The first thing is to create the SSH authentication. We go to the user root folder, create a folder called .ssh. We move to it and through the shh-keygen command we create a key associated with the email account. We are going to use an RSA type key, so that the command would be:
ssh-keygen -t rsa -C “correo@dominio.com”
It asks us where we want to save the file with the key. We can select the default option.
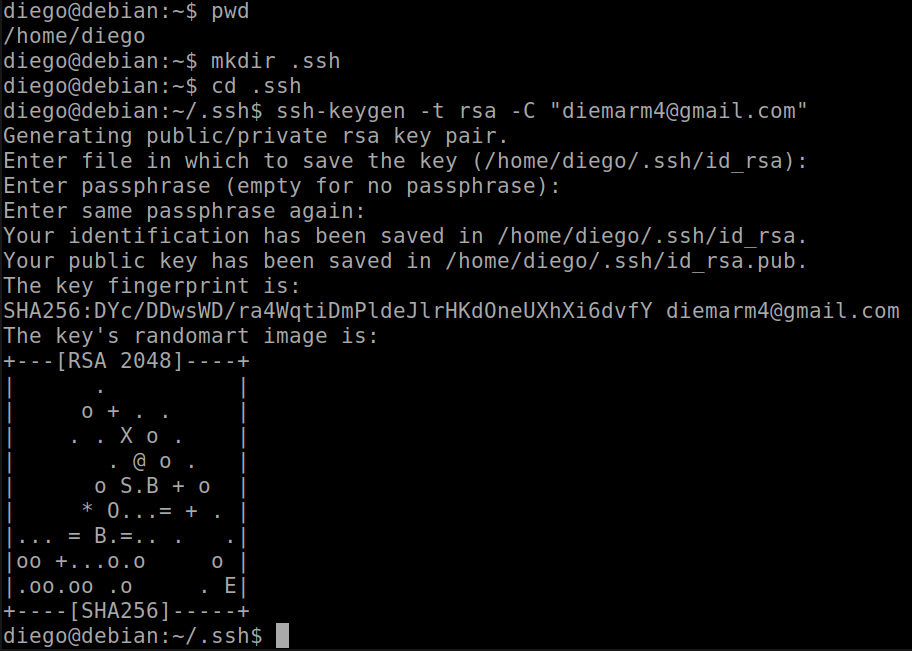
With ls -al we can see in detail the new files generated in the operation.
The .pub file is the public key, which we’ll push to GitHub. To do this we must open the document and copy its content.
The Nano editor can be a bit complex to use for these operations. Here are other alternatives for Linux: How to open a particular file from a terminal? . I will use
xdg-open nombre_archivo
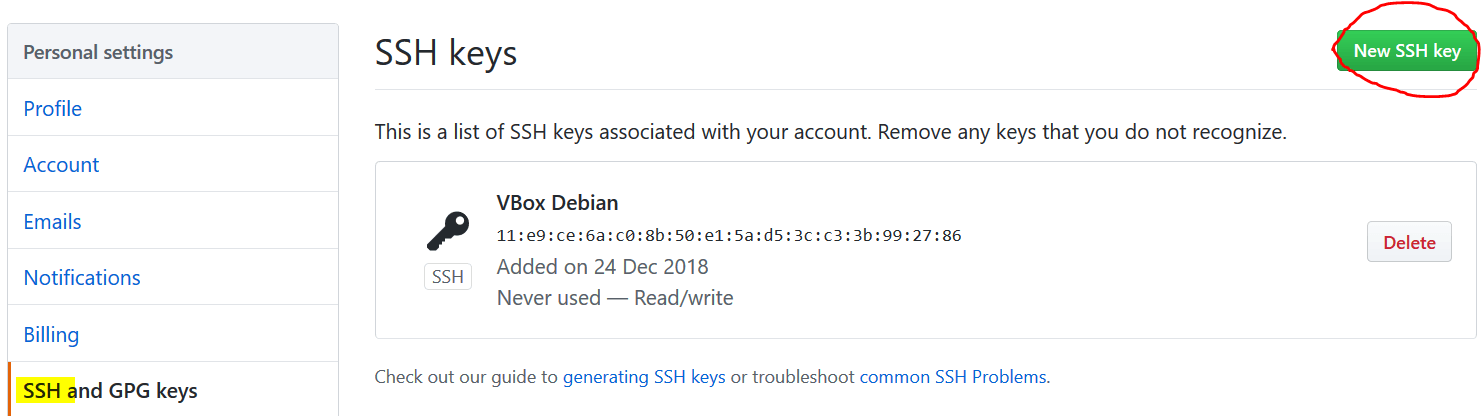
Now we log in to GitHub and go to Settings à SSH Keys and create a new one, indicating a descriptive name, remember that this is associated with the computer from which we work, and the public key that we have previously copied.
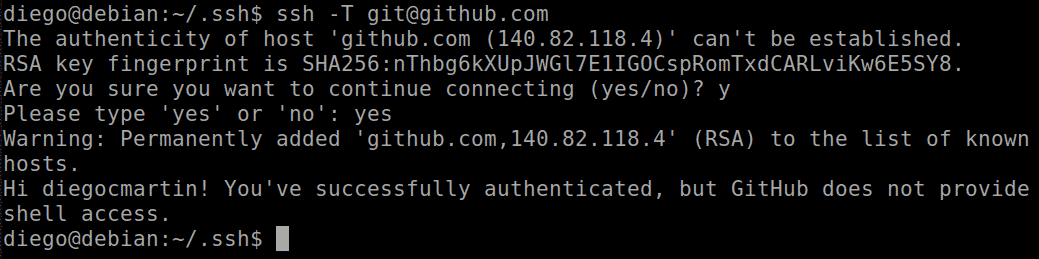
Now we execute
ssh -T git@github.com
And we should authenticate correctly:
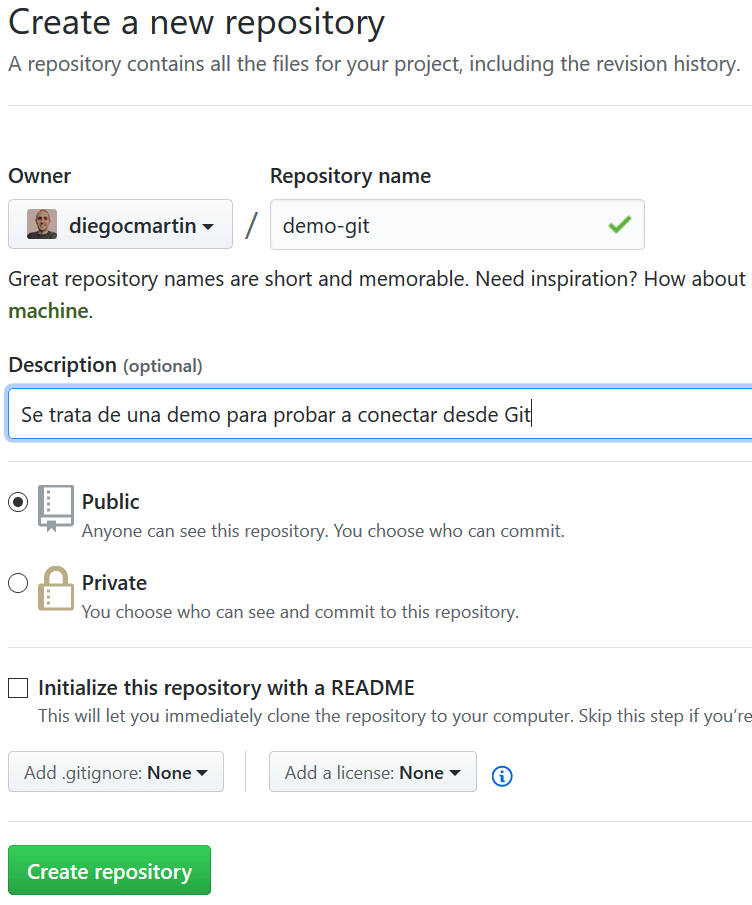
Let’s first create a new repository from the GitHub web app while logged in.
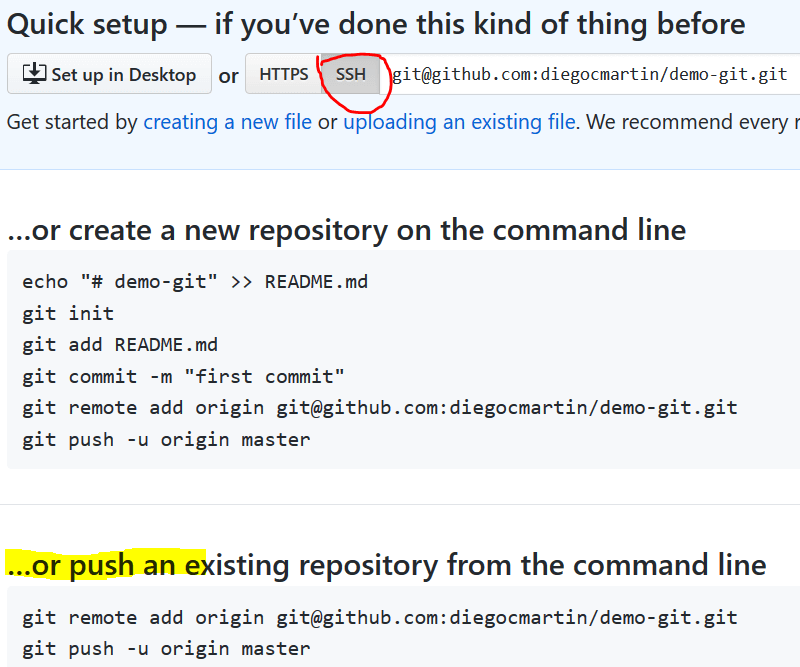
Once created, on the next screen we click on SSH at the top to see the command line submission instructions.
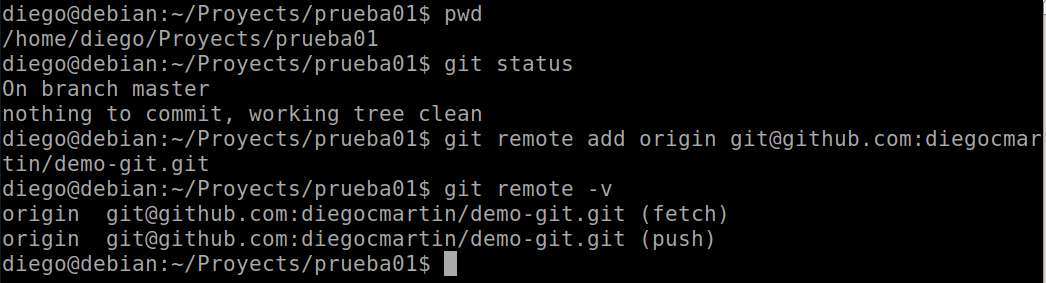
Now we move to the project we want to work with. We see that the status is nothing pending and we execute the first command. Using after…
git remote -v
The remote command is used to see the associated remote repositories. with the -v option we see the URL:
The URLs that we see in the previous screenshot are of the SSH type, indicating that we could send. We can also add repositories of other users to receive with the command git remote add[nombre][url] .
Example: $ git remote add pb git://github.com/paulboone/ticgit.git
To receive the files from one of these repositories from another user, we use the fetch command followed by the name that we have put in the previous command.
Example: git fetch bp
Now we are going to send the files locally to the remote repo with push and the -u option to establish a link between them, also specifying the remote repository (origin) and the working branch (master), leaving:
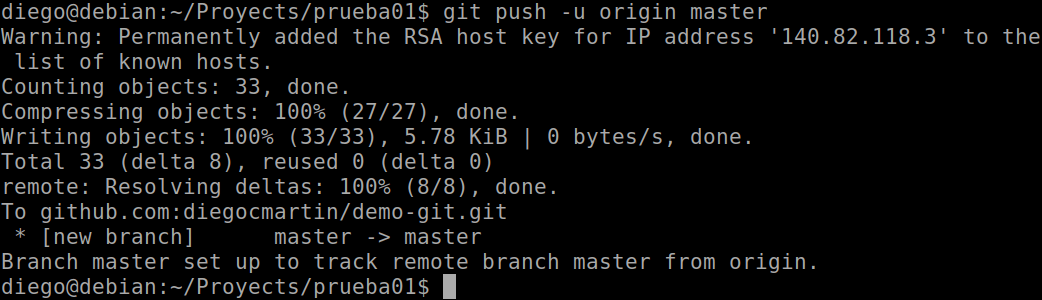
Once the link is established, it will not be necessary to use the -u option, leaving the instruction to update the changes in the remote repository as follows:
git push origin master

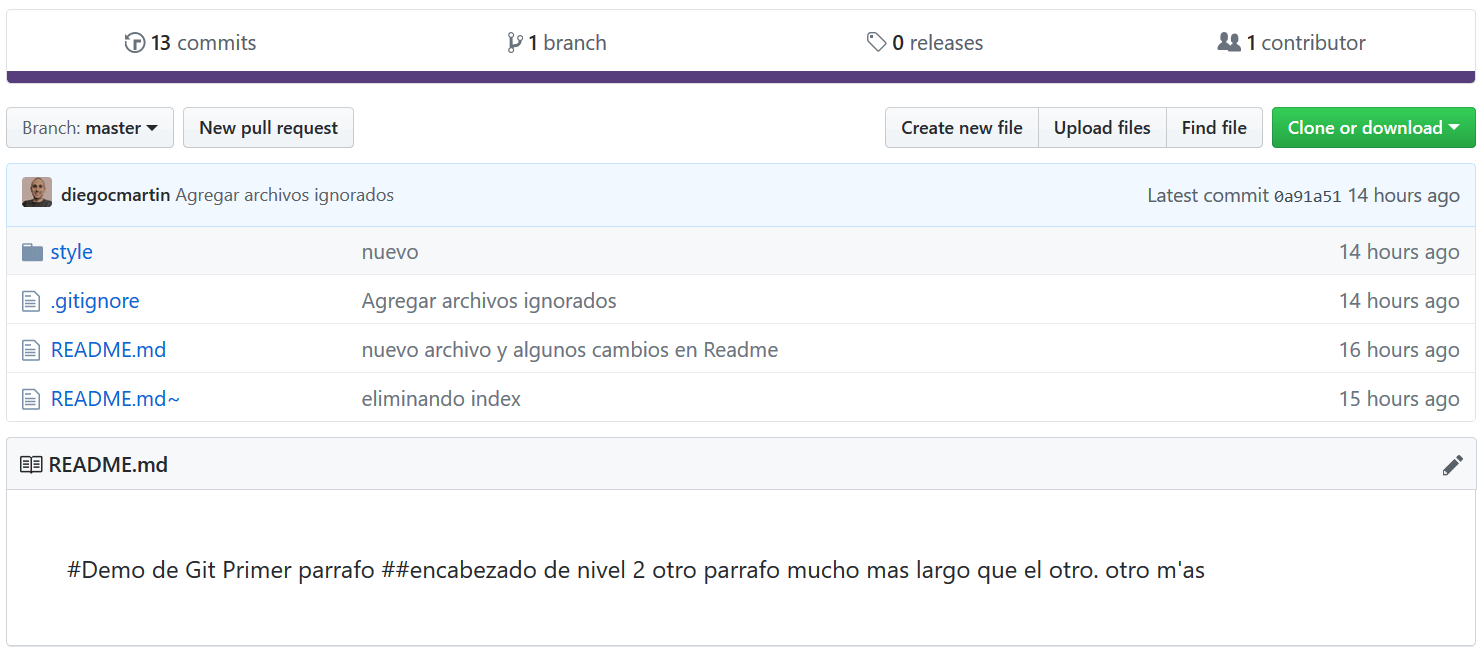
Now we can see the updated repository on GitHub:
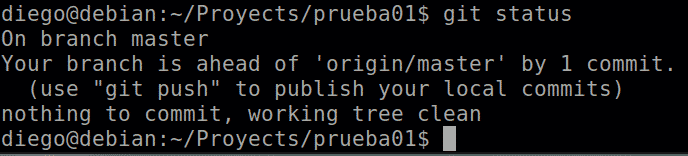
Now we are going to modify or add some file to the local repo and update the remote one again.

If we see the status now, it tells us that there are changes pending to be synchronized with the remote:
Although I am working alone now, the logical thing is to request the latest changes through a pull, before sending ours with a push, to avoid conflicts with other team members. So we run:
git pull origin master
git push origin master
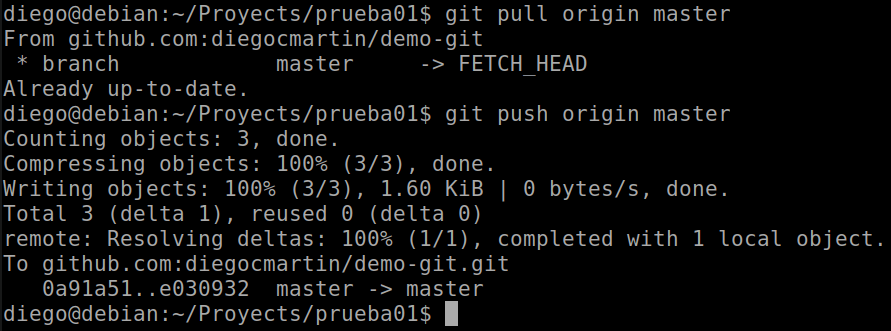
We can already see the new changes in the remote repository.
When doing pull , the system retrieves and tries to merge the remote branch with the local one, while with the fetch command that we saw before it does not. More info in the official documentation .
Git is a very powerful version control system. It’s not as straight-forward as Subversion or Perforce, but it does allow for a lot more flexibility. Setting up Git can be a little intimidating at first, but if you take the time to learn the commands it becomes second nature. In this tutorial I guide you through the use of Git version control step by step. You can easily copy avery command to apply it to your own project.

